Table of contents
- Introduction
- Setup
- Installing the package
- Create environment variables
- GoogleReCaptchaProvider component
- Triggering the reCaptcha validation
- API to handle form submission
- Testing
Introduction
In this post, we will be adding Google ReCaptcha v3 inside of our Next.js application. This is one way to stop spam and abuse on contact forms and it's what I'm using for this website.
Google ReCaptcha v3 is awesome because it allows us to verify if an interaction is legitimate without any user interaction. Users won't be given a challenge to determine if they are human or not, all the work happens behind the scenes. Instead, a score between 0 and 1 will be returned from an API giving us the ability to take action as required. The closer the score is to 0 the more likely it is a bot.
For the purposes of this implementation, we will only allow form submission if the score returned is greater than 0.5.
Setup
Let's get setup before we start coding. You will need to be signed in to a Google account to start. First, we need to create a recaptcha key, which you can get from here.
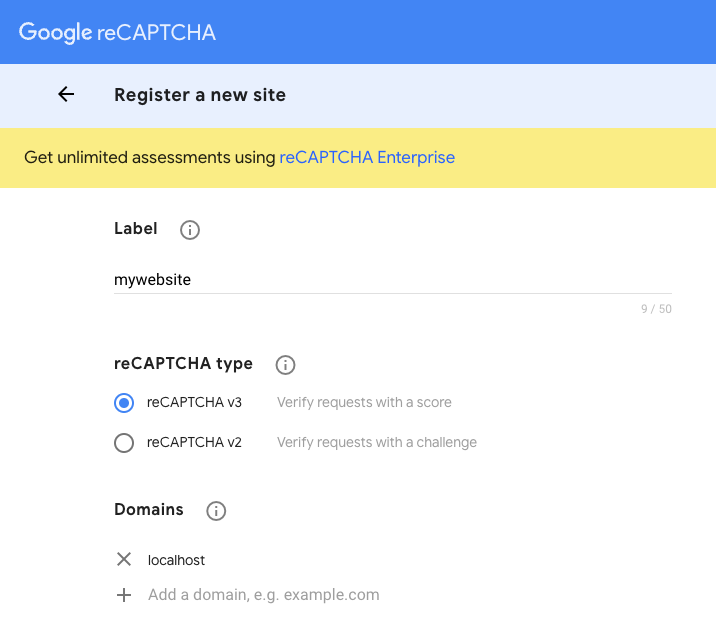
Type in a Label (this can be anything you want), select reCAPTCHA v3 and add localhost to Domains. See the image below for what this should look like. As an additional note, if you are planning on deploying your app on a domain that you own, that domain name should be added here. For example, I added garrysingh.dev for this website.

After submitting, we will land on a page showing some credentials. Copy and store the SITE_KEY and SECRET_KEY provided.
Installing the package
Inside of our Next.js application, we need to install the react-google-recaptcha-v3 package.
npm i react-google-recaptcha-v3
yarn add react-google-recaptcha-v3
You can find the docs for this package here.
If you are following along with this implementation, you will also need the axios package which you can find here.
Create environment variables
Create a .env.local file inside the root of the Next.js application. This is where we will store the SITE_KEY and SECRET_KEY that we created earlier. If you are hosting your website, make sure to add these environment variables for deployment.
RECAPTCHA_SECRET_KEY='your_secret_key'
NEXT_PUBLIC_RECAPTCHA_SITE_KEY='your_site_key'
Make sure to replace your_secret_key and your_site_key with the ones that you have created.
GoogleReCaptchaProvider component
The react-google-recaptcha-v3 package provides us with a GoogleReCaptchaProvider component that we will use to wrap our entire Next.js application. The purpose of this component is to load the necessary reCaptcha script and provide access to the reCaptcha for the rest of our application.
import "../styles/globals.css";
import { GoogleReCaptchaProvider } from "react-google-recaptcha-v3";

function MyApp({ Component, pageProps }) {
  return (
    <GoogleReCaptchaProvider
      reCaptchaKey={process.env.NEXT_PUBLIC_RECAPTCHA_SITE_KEY as string}
      scriptProps={{
        async: false,
        defer: false,
        appendTo: "head",
        nonce: undefined,
      }}
    >
      <Component {...pageProps} />
    </GoogleReCaptchaProvider>
  );
}

export default MyApp;
Triggering the reCaptcha validation
There are a few ways to trigger the reCaptcha validation. We will be using the custom hook useGoogleReCaptcha which is the recommended approach from the documentation. To do this, we simply import the hook inside the component where we want to trigger the validation. This is typically the component responsible for handling form submission.
import { useGoogleReCaptcha } from "react-google-recaptcha-v3";
We have access to the executeRecaptchca function from the useGoogleReCaptcha hook.
const { executeRecaptcha } = useGoogleReCaptcha();
We will use this function inside our handleFormSubmit function. The executeRecaptchca function returned from the hook can be undefined when the recaptcha script has not been successfully loaded so we can check upfront to see if it is available. We then make a POST request to our API which we will come to in the next section.
We will receive a response which we can then use to alert our users to the status of their submission.
const handleFormSubmit = async (event: FormEvent) => {
    event.preventDefault();

    if (!executeRecaptcha) {
      return;
    }

    try {
      const token = await executeRecaptcha();

      if (!token) {
        setResponse({ message: "Failed to Send!!!", status: "Failed" });
        return;
      }

      const result = await axios.post("/api/contact", {
        token,
      });

      if (result.data) {
        setResponse({
          message: result.data.message,
          status: result.data.status,
        });
      }
    } catch (error) {
      console.log(error);
      setResponse({ message: "Failed to Send!!!", status: "Failed" });
    }
  };
API to handle form submission
As mentioned in the previous section, we are making a POST request to the API /api/contact. We need to create a contact.ts (or contact.js) file inside the pages/api directory in our application to manage this POST request.
We will send a POST request to the verification URL providing the SECRET_KEY we created earlier and the token we sent from the form submission.
If the response is successful and the score returned is greater than 0.5, we can return a success message and/or store information inside a database. Otherwise, we return an error message.
import axios from 'axios';
import type { NextApiRequest, NextApiResponse } from "next";

const verifyRecaptcha = async ( token: string ) => {
  const secretKey = process.env.RECAPTCHA_SECRET_KEY;

  var verificationUrl =
    "https://www.google.com/recaptcha/api/siteverify?secret=" +
    secretKey +
    "&response=" +
    token;

  return await axios.post(verificationUrl);
};

const handler = async (
  req: NextApiRequest,
  res: NextApiResponse
) => {
  try {
    const token: string = req.body.token;

    // Recaptcha response
    const response = await verifyRecaptcha(token);
    console.log(response);

    if (response.data.success && response.data.score >= 0.5) {
      return res
        .status(200)
        .json({ status: "Success", message: "Thanks for your message!" });
    } else {
      return res.json({
        status: "Failed",
        message: "Something went wrong, please try again!!!",
      });
    }
  } catch (error) {
    console.log(error);
    res.json({
      status: "Failed",
      message: "Something went wrong, please try again!!!",
    });
  }
}

export default handler;
Testing
That's it! We have now integrated Google ReCaptcha v3 into our Next.js application. To test this, submit the form on the front end. You should see the score that is returned from Google inside the terminal.
